Full procedure for E-Tech M software* update (*Control Unit & Display)
The full procedure is comprised of the following main steps:
- Check the software versions of E-Tech M (Control unit & Display)
- Upload of the new files on a USB stick to update the E-Tech M
- Update the E-Tech M Control Unit software
- Update the E-Tech M Display software
1. Check the software versions of E-Tech M (Control unit & Display)
Two software packages are installed on the E-Tech M, that can be updated: the Control Unit software and the Display software. You first have to check which version of software are installed of your E-Tech M.

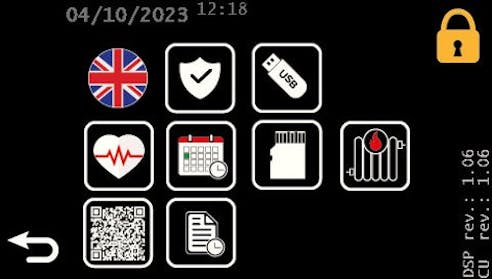
Click on the menu button (gear wheel)
The versions are at the bottom right of the screen
DSP = display
- The display software version can always be checked when the screen is started.
- Note: the display version on this menu is only displayed from version 1.06 onwards
CU = Control Unit
- Versions lower than 1.06 only display the Control Unit version
2. Prepare the USB stick with files to update your E-Tech M
Updating the software versions of your E-Tech M is carried out using a USB stick.


Download the latest software version for E-tech M from https://www.acv.com/international/page/usb-key-flash
Use a USB stick of max 32GB formatted in FAT32.
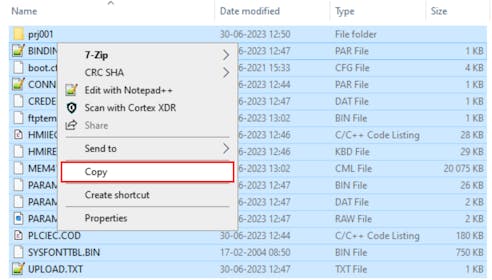
Copy and paste all the files in the "COPY_TO_USB" folder onto a USB stick.
- All the files must be located in the root folder of the USB stick, as shown opposite.
- Eject your USB stick from your computer.
3. Update the E-Tech M Control Unit software
Once your USB stick is ready, you can start updating the control unit software.


Switch off the appliance
Insert the USB stick into the front panel
Switch on by turning the button to the right
- The control unit will update automatically when the boiler starts up
- Please wait ± 20 seconds, the control unit will restart automatically.
As soon as the ACV logo disappears, the control unit has performed the update.
Don't forget to remove the USB stick
4. Update the E-Tech M Display software
Once your USB stick is ready, you can start updating the display software.
To update the display software, you will need to remove the top panel of the E-Tech M in order to access the USB port. It is located behind the screen.


Switch the boiler off (position "0")
Unscrew the 6 screws holding the top cover in place
Lift the cover and remove it to the right
Pay attention to wiring
Do not disconnect the cables at the back.
Position the panel vertically and securely on top of the boiler, without pulling on the cables. Make sure it icannot fall.
Plug the USB stick into the socket at the back of the display
Replace the panel on the boiler without screwing it back on at this stage.


Switch on the boiler by turning the button to the right
Wait until the appliance passes the ACV logo.
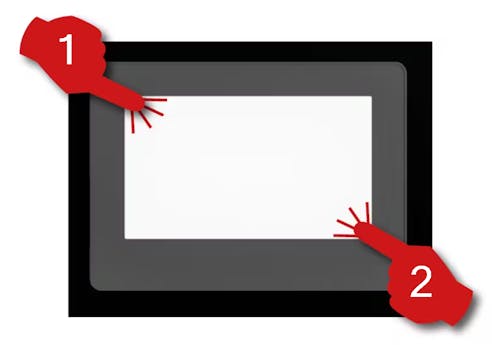
Enter the system menu by touching the top-left corner then the bottom-right corner of the display within 0.5 seconds.
A menu bar is displayed at the bottom of the screen.
With the arrow key, change page until you reach the “USBStart” function.
Touch the “USBStart” key.
Touch the “USBStart” key once again.
The “Memory Loader Tool” screen appears.
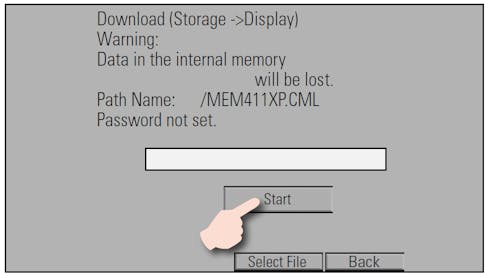
Touch “Download (--> Display)” function.
Touch “Start” to initiate the process.
No password is required. Then validate the transfer (Flash).
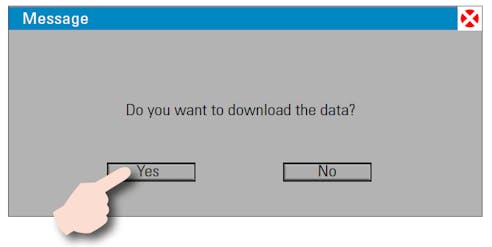
Confirm your download by clicking on “Yes”, then follow the instructions on the screen...
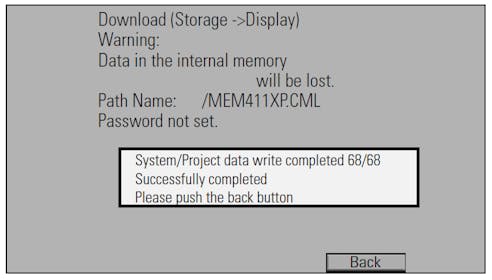
...till you reach this screen.
It is finished, your display is updated.
Check the version number when the boiler is started up
Once the procedure is complete :
- Switch off the E-Tech M,
- Remove the USB stick
- Reassemble the device in the reverse order of disassembly.
- To check that the flashing procedure was correctly performed, check the software version shown in the main menu (see step 1 of this procedure)
The procedure is now complete.
Search on acv.com
A keyword, a reference, a range, a product,...
